Workflows and automation
À l'issue de ce chapitre
- create an automation rule triggered by an event;
- tell a rule, a scheduled action and a communication template apart;
- place AI-assisted automation in relation to deterministic rules;
- design a workflow and maintain it over time.
Automating means having the system carry out the repetitive tasks and the systematic checks, so as to reserve users' attention for the decisions that deserve it.
Odoo offers several complementary mechanisms: automation rules, triggered by an event; scheduled actions, triggered by the calendar; and communication templates.
A fourth mechanism exists, for the cases where the decision does not reduce to a fixed condition: the server action assisted by artificial intelligence. It is covered in chapitre 20, with the rest of the assistance features.
Automation rules
A rule executes an action when an event occurs on a data model and conditions are met.
Prerequisite: installing the module
Automation rules are not available on a fresh database: they are brought by the Automation Rules module, which does not install by itself and has no toggle in the settings. As long as it is missing, the Automation group of the Technical menu only offers Scheduled Actions and Scheduled Actions Triggers.
- Open Apps.
- Remove the Apps filter, active by default, or replace it with the Extra filter: the module is not an application and stays invisible otherwise.
- Search for
Automation Rulesand install it.
Note
The module is already present if Studio is installed: Studio depends on it and brings it in automatically. On an Enterprise database where Studio has been used, the menu entry therefore already exists.
Creating a rule
- Activate developer mode (see chapitre 3).
- Open Settings › Technical › Automation › Automation Rules.
- Click New.
- Fill in an explicit name, describing the effect obtained.
- Select the Model concerned: opportunity, order, invoice, task, manufacturing order.
- Choose the Trigger.
- Narrow the application with a domain: the rule will only execute on the matching records.
- Add the actions to execute.
- Save.
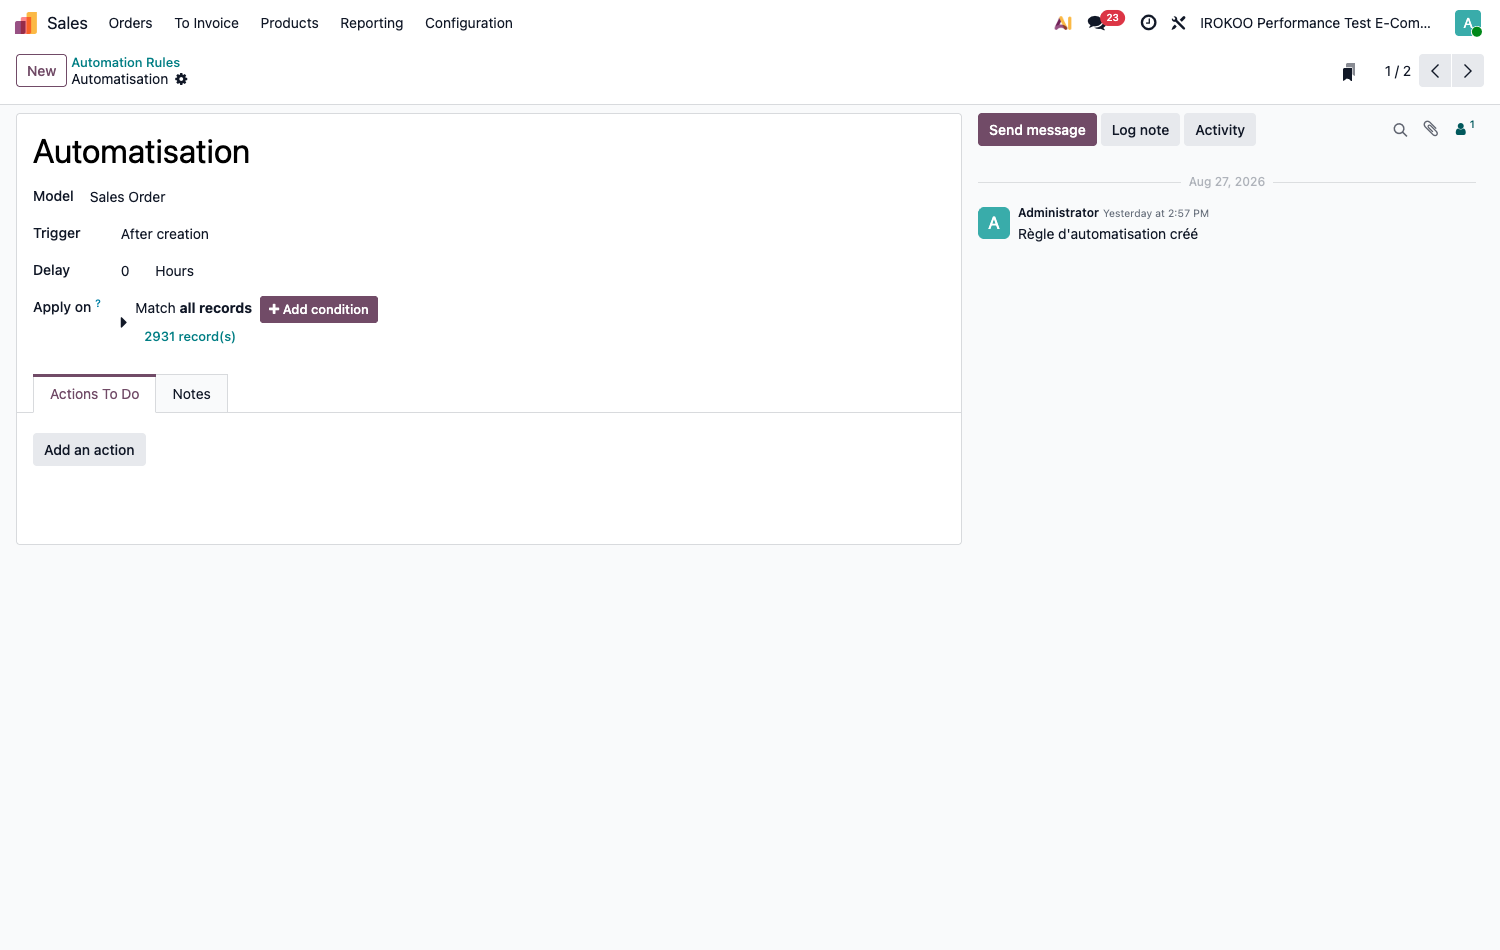
The main triggers
The complete list has eighteen triggers, split into five groups in the selector. The table below keeps the most common ones.
Point d'attention
The list offered depends on the model chosen. A trigger only appears if the model carries the corresponding field: Stage is set to requires a stage field, On archived an archiving field, and the message triggers a model with a chatter. Not finding a trigger is therefore not an anomaly.
| Trigger | Moment of execution |
|---|---|
| On create | A record is created. |
| On create and edit | A record is created or modified. |
| Stage is set to | The record reaches a given stage. |
| On archived | The record is archived. |
| On unarchived | The record is unarchived. |
| Based on date field | A delay before or after a date on the document. |
| On incoming message | A message is received on the document. |
| On webhook | An external system calls a dedicated address. |
The possible actions
- Send an email from a template.
- Create an activity assigned to a user.
- Update a field on the record.
- Create a linked record.
- Add followers to the document.
- Post a message or an internal note on the document , that is the Send Email type, whose posting method is set to Message or Note.
- Execute code, for the cases no standard action covers. This route requires a developer.
Common examples
- Create a follow-up activity three days after sending a quotation that has gone unanswered.
- Notify the manager as soon as an order exceeds a given amount.
- Add the quality manager as a follower of every manufacturing order for a sensitive product.
- Send an acknowledgement of receipt when a customer request is created.
- Alert the credit department when a customer exceeds their credit limit.
Point d'attention
A rule that modifies a record can trigger another rule, which triggers a third. Before creating a rule on an already automated model, check the existing rules: unintended chains are hard to diagnose and costly in performance.
Astuce
Test every rule on a test database before activating it in production, and above all check it on a record that must not trigger it. That is where badly written domains show themselves.
Scheduled actions
Where a rule reacts to an event, a scheduled action executes at regular intervals, without anyone having done anything. Odoo's background processing relies on this mechanism: replenishment computation, generation of recurring invoices, sending of summaries, payment follow-ups, purging of temporary data.
- Activate developer mode: the Technical menu is only visible on that condition.
- Open Settings › Technical › Automation › Scheduled Actions.
- Open an existing action or click New.
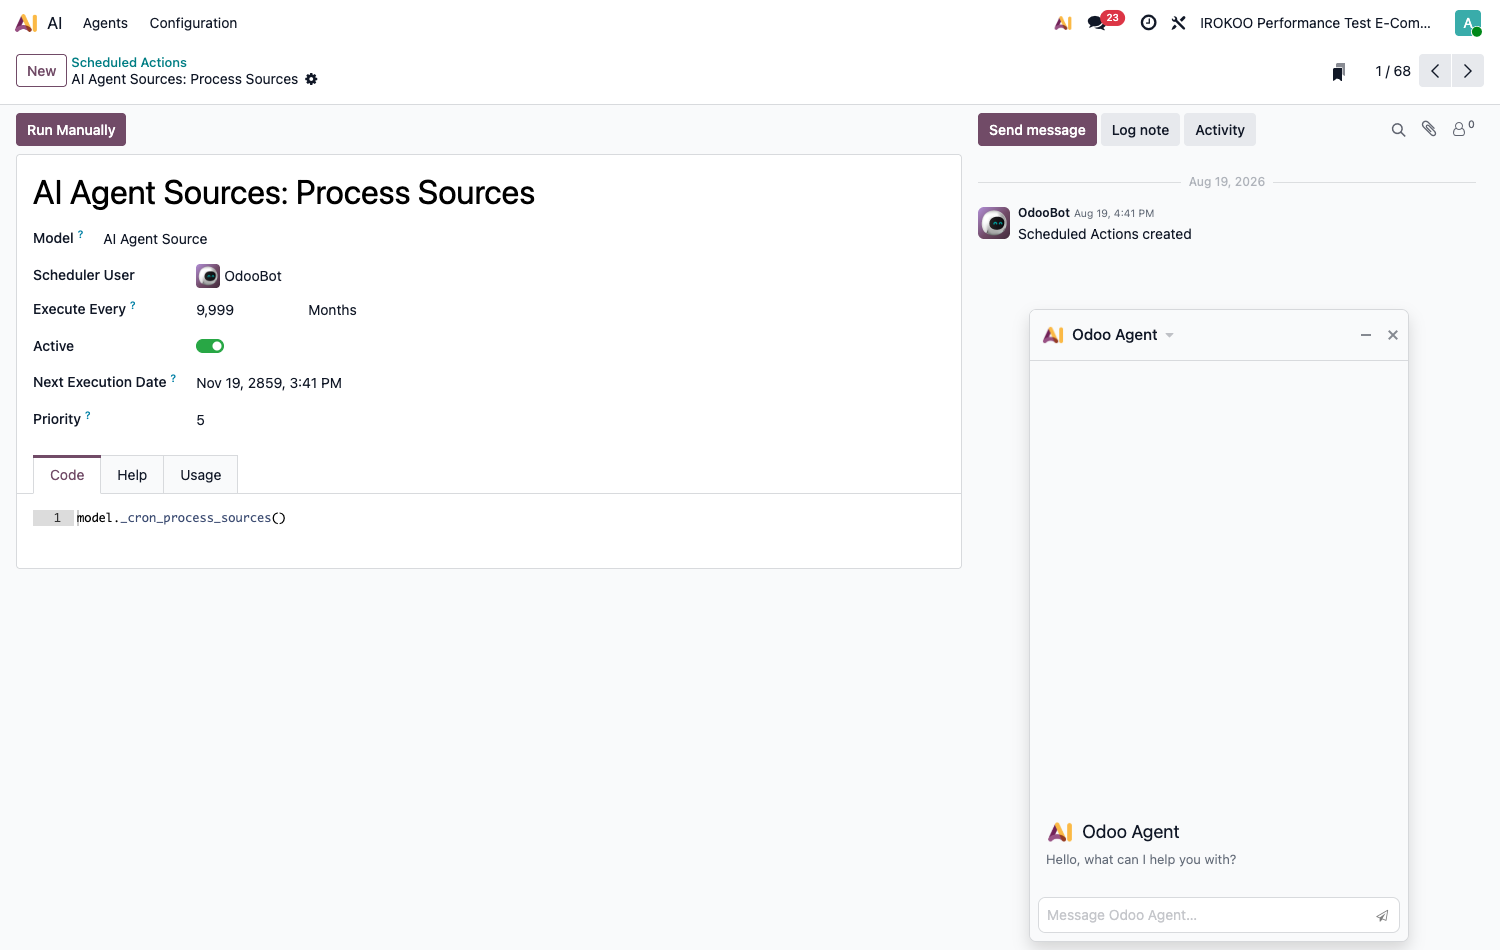
Reading the form
| Field | Role |
|---|---|
| Model | The data model the action operates on. |
| Scheduler User | The account the processing runs under. It determines the access rights applied: too restricted a user makes the action fail. |
| Execute Every | The frequency: a number followed by a unit: Minutes, Hours, Days, Weeks, Months. |
| Active | Activation toggle. A deactivated action is not deleted, it simply stops running. |
| Next Execution Date | The next run planned. Changing it shifts the cycle without changing the frequency. |
| Priority | Order of execution when several actions are due at the same time. The scale is inverted: 0 is the highest priority, 10 the lowest. The default value is 5. |
The Code tab contains the instruction executed at each run: this is code, not to be reworked without a developer's advice. The Help tab documents the available expressions. The Run Manually button, at the top of the form, triggers the processing immediately, without waiting for the due date and without shifting the cycle , that is the way to check that an action does what is expected.
Note
The neighbouring entry Scheduled Actions Triggers lists the one-off executions queued by Odoo to run an action before its normal due date: for instance when a document has just been created and must be processed without waiting. These triggers are placed by the code, not by hand.
Point d'attention
Do not change the frequency of the standard scheduled actions without an identified reason. Spacing out the replenishment computation, for example, delays the triggering of orders by as much.
Note
An action that fails is not deactivated at the first incident: Odoo counts consecutive failures and only deactivates it from five failures and a week of continuous failures, notifying the administrator. A process that has stopped running with no explanation therefore deserves a check of its Active toggle before any other hypothesis. The counter is reset as soon as a run succeeds.
Communication templates
An email template is a pre-written message, attached to a data model, whose content is filled in from the record being sent. Odoo ships several dozen: quotation confirmation, purchase order sending, due date reminder.
Creating or modifying a template
- Activate developer mode.
- Open Settings › Technical › Email › Email Templates.
- Open an existing template, or click New.
- Fill in the header: Template Name, Applies to (the data model) and Subject.
- Complete the three tabs described below.
- Click Preview: Odoo asks for a real record and shows the message as it will go out, fields resolved.
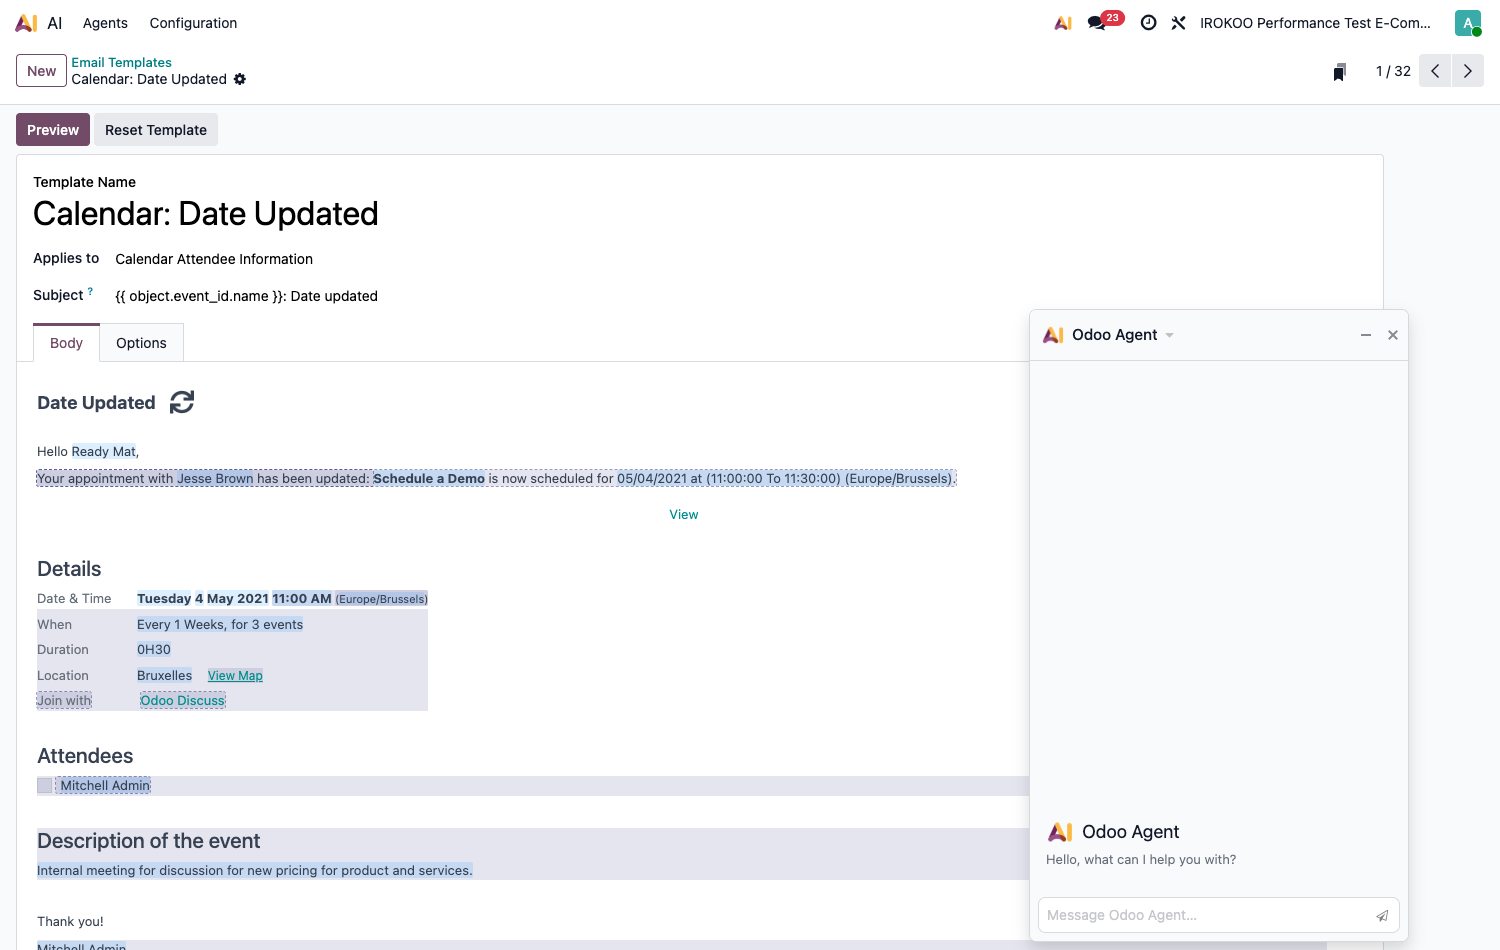
The Body tab
The body of the message is written in the rich text editor. Variable values are not typed by hand: they are inserted through an editor command.
- Place the cursor where you want it in the body.
- Type
/followed by a few letters. The command sought is called Dynamic Placeholder, subtitled Insert a field and marked with a hash; it appears both by typing/field(the search covers the subtitle) and by typing/dyn, which targets the title. - Confirming it opens the record's field selector: contact name, document reference, amount, scheduled date. Relation fields can be browsed in depth there.
- Once the field is chosen, Odoo shows Enter a default value: the text to write if the field is empty at the time of sending. Leaving it empty is possible, but an unfilled field will then leave a blank in the message.
- Click Insert.
Astuce
The same command is reachable without the keyboard: on an empty line of the body, a hash icon appears and opens the selector directly.
The Subject accepts the same mechanism, but in the form of an expression between double braces.
The purchase order template thus carries
{{ object.company_id.name }} Order (Ref {{ object.name or 'n/a' }}): the company name
then the order reference, with a fallback value if it is empty.
Note
On an Enterprise database with the artificial-intelligence features, a second command
/prompt is added in the body to produce a passage written on the fly. The hint shown
below the editor then mentions both commands.
The Settings tab
This tab only appears in developer mode. It carries two groups.
Sender & Recipients: Send From (empty, Odoo takes the alias or the author's address), Default Recipients, and Reply To. Unticking Default Recipients reveals the explicit addressing fields, to be filled in as comma-separated lists.
Technical: Language (empty, the message goes out in the main contact's language), Auto Delete, Scheduled Send Date, which defers the sending instead of letting it go out immediately, and Outgoing Mail Server, which only appears if an SMTP server is configured.
Point d'attention
Auto Delete is ticked by default. It permanently erases all trace of the message once it has gone, including from the technical email menu: the gain is in storage space, the price is the disappearance of the proof of sending. On communications with contractual value (purchase orders, invoices, reminders) untick the box.
The Options tab
- Attachments: the files attached systematically to every sending.
- Dynamic Reports: the PDF documents regenerated at sending time for the record concerned. The purchase order template carries the corresponding report there, which explains why the order goes out as an attachment without any file being stored on the template.
- Owner: left empty, the template is shared with all users.
- Template Description: an internal note stating when to use the template. It is shown in the list of templates.
The header buttons
| Button | Effect and display condition |
|---|---|
| Preview | Shows the rendering on a real record. Always available. |
| Reset Template | Restores the version shipped by the module and cancels the local modifications. Only appears on the templates shipped by Odoo (never on those you create) and requires membership of the email template editors group. |
| Add Context Action | Makes the template appear in the cog menu of the records of the data model concerned. Reserved for developer mode and administrators; becomes Remove Context Action once placed. |
Templates are then used manually from a document, through the send button, or automatically from an automation rule.
Designing a workflow
- Describe the real process, as it happens today, listing the steps and the people involved.
- Identify the bottlenecks and the repetitive tasks.
- Determine the conditions for moving from one step to the next.
- Translate those steps into Odoo: document statuses, tracking fields, access rights controlling who validates what.
- Automate the transitions and the notifications.
- Provide for the exception case: what happens if the step is not completed within the time allowed?
Example: approving an expense report
- The employee enters their expense report: draft status.
- Automation: notification of the manager for approval.
- The manager approves: approved status.
- Automation: creation of an activity for the accounting department.
- The accountant checks the receipts and validates.
- Automation: generation of the payment.
- The payment is executed: paid status.
- Automation: notification to the employee and closing of the file.
Integrating external systems
Available interfaces
- External API, to read and write in the database from another application.
- Incoming webhooks, allowing a third-party system to trigger an automation rule.
- Ready-to-use connectors: payment methods, carriers, marketplaces, communication tools.
Use cases
- Synchronisation with an external online store.
- Exchange of documents with a partner, in electronic format.
- Feeding a business intelligence tool.
- Interfacing with a specialised business application.
Astuce
Before having an integration developed, check the Odoo app marketplace: a connector maintained by a publisher generally costs less than a bespoke development, and survives version upgrades better.
Good practice
Proceed in stages
- Map the processes before automating anything at all.
- Rank the automations by their real benefit and their complexity.
- Start with the simple, risk-free cases.
- Test every automation, including on the cases that must not trigger it.
- Train the users on what changes for them.
- Measure the result and adjust.
Pitfalls to avoid
- Automating a process that requires human judgement.
- Building rules so complex that nobody knows what they do any more.
- Creating rules that contradict each other or chain unintentionally.
- Documenting the automations put in place nowhere.
- Neglecting the edge cases: zero amounts, missing dates, archived records.
Monitor over time
- Periodically check that the active rules are working properly.
- Consult the technical logs in case of unexpected behaviour.
- Update the automations when the process they serve changes.
- Appoint an owner for every critical automation.
Note
An automation with no identified owner becomes, at the first process change, a cause of malfunction whose origin nobody knows any more. Keep a list of the active rules, of their purpose and of their owner.