Managing purchases
À l'issue de ce chapitre
- reference your vendors and their conditions on the product records;
- draw up a request for quotation and confirm it as an order;
- have the quantities to order computed from observed consumption;
- receive goods, check the vendor bill and record its payment;
- automate replenishment and measure your vendors' performance.
The Purchase app covers the whole supply cycle: consulting vendors, ordering, receiving, checking and paying bills. It works together with Inventory for stock movements and with Accounting for the journal entries.
Configuring purchases
General settings
- Open Purchase › Configuration › Settings.
- Set the options according to your internal procedures: - Lock Confirmed Orders: prevents any modification after confirmation; - Receipt Reminder: automatically follows vendors up before the expected date; - Purchase Agreements: lets you consult several vendors for the same need and formalise negotiated conditions over a period; - Warnings: displays a message when entering an order for a given vendor or product; - Purchase Order Approval: sends orders above a Minimum Amount for approval.
- Save.
The Logistics block gathers two options that connect purchases to sales. It only appears if the Sales app is installed.
Replenishing on order
The Replenish on Order (MTO) option triggers supply when a sales order is confirmed, rather than by rebuilding stock. Each sale directly generates the operation matching it, and the documents stay linked to one another.
It suits items that would be costly or pointless to stock: made-to-measure products, expensive references, slow-moving or perishable items.
Note
This option does not determine how to replenish, only when. What gets triggered depends on the route carried by the product: a request for quotation for an item set to Buy, a manufacturing order for an item to be produced.
Point d'attention
The setting merely makes the route available. It still has to be applied product by product, in the Inventory tab of their record: ticking the option changes the behaviour of no item at all until the route has been assigned to it.
Direct delivery by the vendor
The Dropshipping option has the goods shipped from the vendor to the customer, without passing through your warehouses. When a sales order is confirmed, Odoo draws up a request for quotation whose delivery address is the customer's.
Like the previous one, it then applies product by product. It also combines with it: direct delivery is a particular way of replenishing on order.
Point d'attention
Ticking this option installs an additional module, an operation that modifies the database and is not undone by simply clearing the box. Keep it for an established need.
Note
Since the goods do not pass through your stock, you check neither their condition nor their conformity before they reach the customer. Reservations on receipt, quality checks and transport disputes are then handled with the vendor, on the customer's word.
Bill control policy
It determines the quantity Odoo carries over onto the vendor bill: the one that was ordered, or the one that was actually received.
This setting is not made in the app settings but on each product, in the Purchase tab of its record, through the Control Policy field:
- On ordered quantities: the bill takes the quantity from the purchase order, whether the goods have arrived or not;
- On received quantities: the bill only takes what has been received.
Point d'attention
On purchases delivered in part, billing on received quantities avoids paying for what has not arrived. Since the setting is carried by the product, a single order can mix both behaviours; check the records are consistent before settling your control procedure.
Note
On a product of type Service, Odoo sets control to ordered quantities as a matter of course: a service is not received , but the value can still be changed by hand. For goods, the value used when a record is created is received quantities.
Astuce
The field only appears for users who have purchase management rights. A buyer without that access level will not see it on the product record (see chapitre 6).
What makes a contact a vendor
Odoo has no "is a vendor" box and no "is a customer" box. A single contact serves both roles, and nothing prevents it from holding both: a carrier who invoices you may buy your written-off equipment.
The distinction rests on two counters carried by the record: the supplier rank and the customer rank. The Purchase › Orders › Vendors menu does not display a category of contacts, it filters those whose supplier rank is greater than zero. The customers menu does the same with the other counter.
How the ranks evolve
- Creating a contact from the vendors menu immediately raises its supplier rank to one. That is the move that makes it appear in the list. Created from the Contacts app, the same contact stays at zero and does not appear there.
- Posting a vendor bill increases the rank by one. Posting a customer invoice increases the other.
- The increase happens when the entry is posted, not when it is entered: a draft does not count, and neither does a purchase order on its own.
- The rank propagates up to the contact's parent company. Invoicing a person attached to a company also credits the company record, which therefore appears in the list itself.
These really are counters, not indicators: a vendor you have worked with for years carries a high rank, an occasional vendor a rank of one. Odoo uses them to offer the most frequently used partners first.
Note
The ranks do not appear on the contact form. They are rarely handled directly: the common case (making an existing contact appear in the vendors list) is settled by recording a first bill in their name, or by recreating them from the vendors menu.
Point d'attention
Ranks are not copied when a record is duplicated: a duplicated contact starts again at zero on both counters and disappears from both lists, even though its record is identical to the original.
Entering the vendor's conditions
- Open Purchase › Orders › Vendors or the Contacts app.
- Open the vendor's record.
- In the Sales & Purchase tab, Purchase column, fill in: - the Buyer in charge of the account, carried over by default onto orders; - the Payment Terms applicable to the bills received; - the usual Payment Method; - the Supplier Currency if it differs from the company's; - the Receipt Reminder and the number of Days Before Receipt, to follow up automatically ahead of the expected date.
- Save.
Note
The supply lead time is not set here. It depends on the item as much as on the vendor, and is therefore entered in the Lead Time field of each line of the Purchase tab of the product record (see section 9.7.1).
Grouping requests for quotation
The Group RFQ field determines whether several needs addressed to the same vendor give rise to a single document or to separate documents:
| Value | Effect |
|---|---|
| On Order | Needs are grouped, except those coming from a replenishment on order, which stay linked to their sale. |
| Daily | Groups the needs whose arrival is expected on the same day. |
| Weekly | Groups by week. A Week Day field sets the reference day. |
| Always | A single document, whatever the expected dates. |
Astuce
A vendor who charges shipping costs per shipment is best set to broad grouping. Conversely, a vendor delivering as needs arise is steered more finely with one document per need.
Measuring punctuality
The On-time Rate smart button on the vendor record shows the share of quantities received on the promised date, over the last twelve months.
Note
The computation only counts lines actually received on confirmed orders, and leaves out services. A quantity that arrives after the expected date counts as zero, even if delivered the next day: the indicator measures whether the commitment was kept, not the size of the delay.
Linking vendors to products
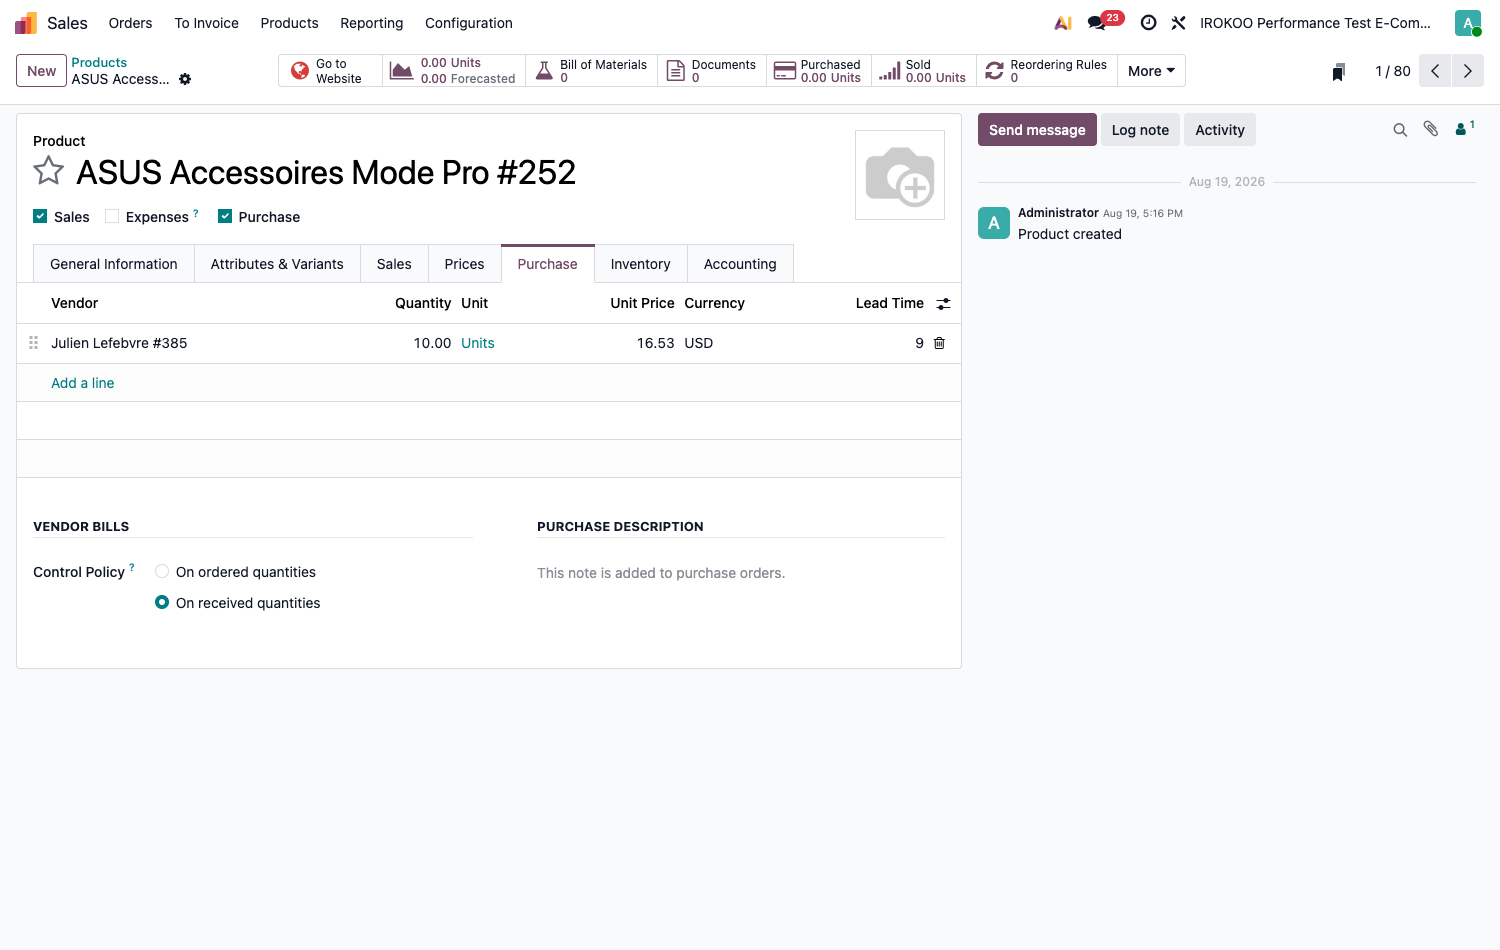
- Open the product record.
- Select the Purchase tab.
- Click Add a line and fill in, for each vendor: - the vendor's name; - the negotiated price and the currency; - the minimum order quantity; - the delivery lead time; - the product's reference at that vendor.
- Save.
Astuce
Always reference a second vendor for your strategic products. The order of the lines is what counts: Odoo offers the first in the list, but the second stays one click away in case of a shortage.
Ordering
Creating a request for quotation
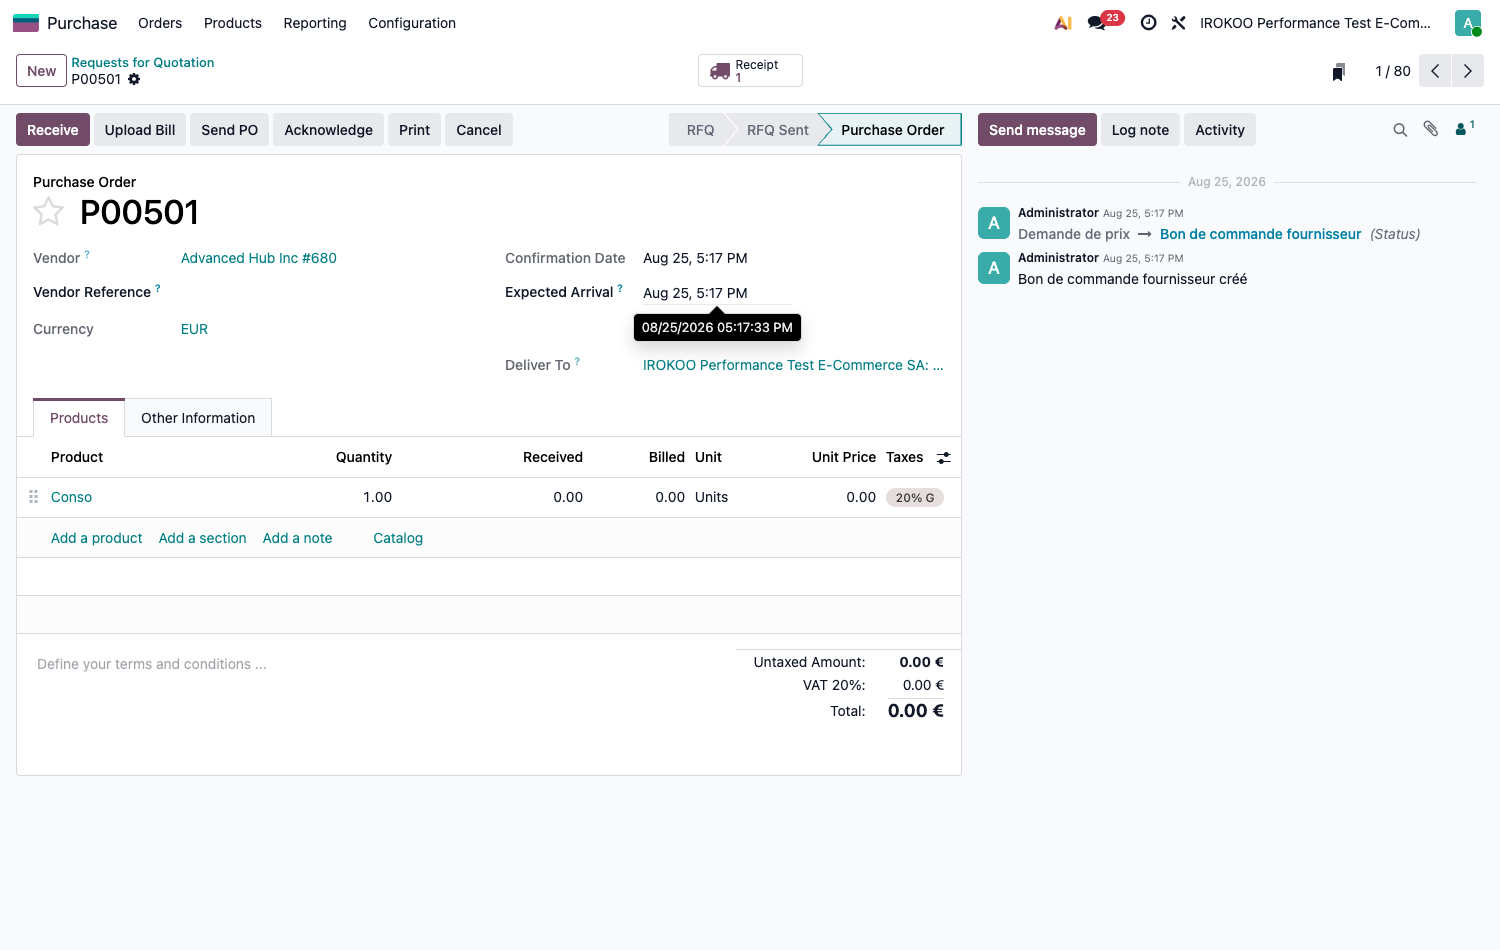
- Open Purchase › Orders › Requests for Quotation.
- Click New.
- Select the Vendor: their payment terms apply automatically.
- Check the Expected Arrival date.
- Add the products, line by line, with the quantities wanted. The price and the lead time come from the product record when the vendor is referenced on it.
- Save.
- Click Send RFQ to send the request to the vendor.
Having the quantities to order computed
Rather than entering the quantities by hand, Odoo can propose them from the consumption observed over a reference period. The method suits regular purchases whose demand is relatively stable: consumables, standard components, everyday materials.
- Create a request for quotation and select the vendor.
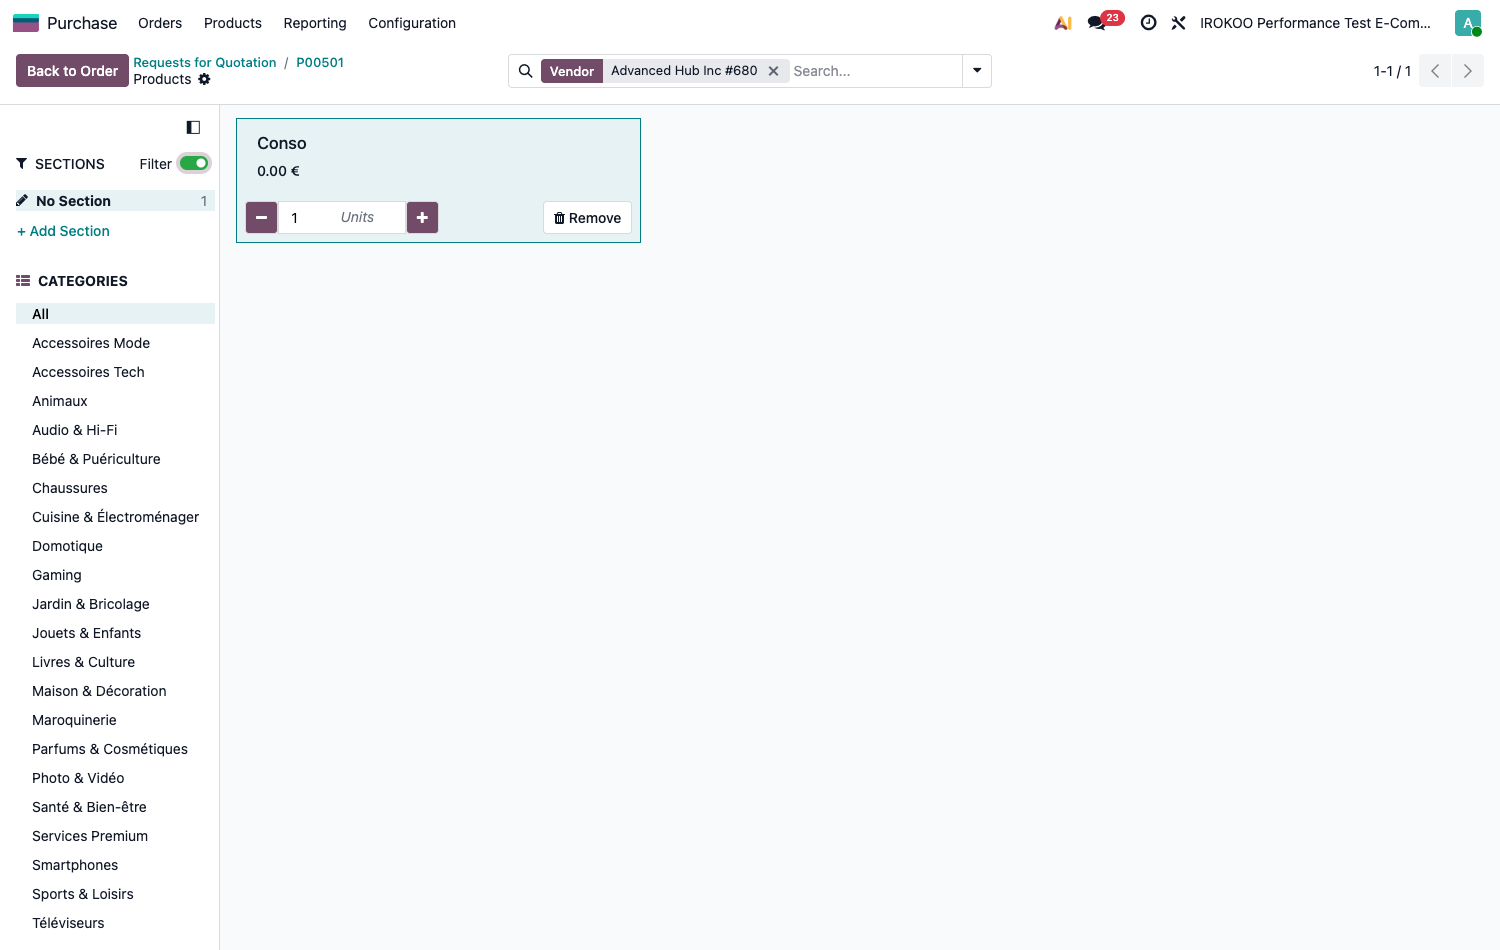
- Click the Catalog button, below the order lines.
- In the side panel, enable Suggest and set the three parameters:
- Replenish for: the number of days of consumption to be covered;
- Based on: the reference period: Forecasted, Last 7 days,
Last 30 days, Last 3 months, Last 12 months,
Same month last year or the matching quarter of the previous year;
- the correction factor, expressed as a percentage:
100to carry forward the observed consumption,120to anticipate a 20% increase. - Odoo displays the suggested quantity for each product in that vendor's catalogue.
- Adjust the quantities if necessary, then close the catalogue: the lines are carried over onto the request for quotation.
How the quantity is computed
Over the reference period, Odoo adds up the outgoing movements from the stock of the warehouse concerned: validated deliveries, components consumed in manufacturing and components sent to subcontractors. That total, divided by the number of days in the period and multiplied by the factor, gives the average daily consumption. Multiplied by the number of days to be covered, it gives the estimated need. The quantity proposed is that need less the stock on hand and the receipts already expected.
Note
Only confirmed or reserved movements enter the computation. Quotations and manufacturing orders still in draft are ignored until they are confirmed. In a multi-warehouse organisation, outgoing internal transfers count as consumption for the warehouse of origin.
Point d'attention
The suggestion carries the past forward. It is unsuited to seasonal products handled over a short reference period, to launches and to end-of-line items. On those items, keep manual entry or choose a reference period covering the previous year.
Confirming the order
- Open the request for quotation.
- Adjust the prices and lead times according to the vendor's reply.
- Click Confirm Order.
The request becomes a purchase order. A receipt is automatically created in Inventory, reachable through the Receipt smart button.
Receiving
Validating a full receipt
- From the purchase order, click the Receipt button.
- Check the products and the quantities announced.
- Click Validate.
The quantities enter stock and the purchase order moves to the received status.
Handling a partial receipt
- Open the receipt.
- In the quantities column, enter what was actually delivered.
- Click Validate.
- In the window offered, choose to create a backorder.
Odoo generates a second receipt carrying the missing quantities, which stays pending until the follow-up delivery.
Note
Declining the backorder settles the order on the quantities received: the missing quantities will never be expected nor billed. This choice is kept for cases where the vendor has definitively cancelled the remainder.
Checking and paying vendor bills
Uploading the bill received
The bill starts from the document sent by the vendor, not from a blank draft.
- Open the confirmed purchase order.
- Click Upload Bill and select the file received: PDF or image.
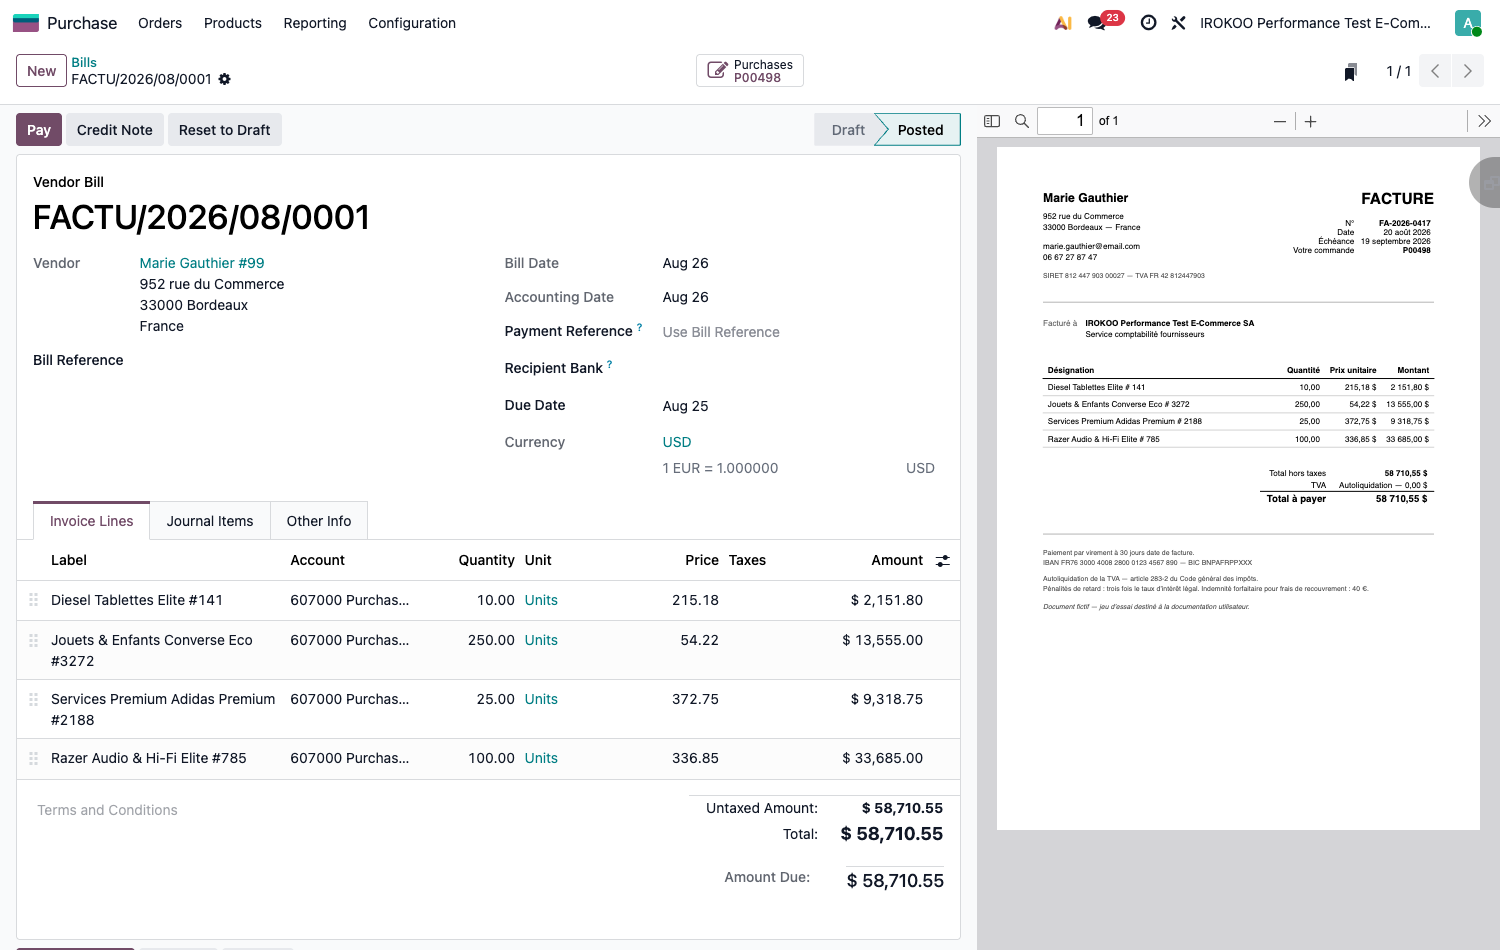
- Odoo creates a draft bill taking the lines from the order, with the vendor's document attached to the record.
- Fill in the Bill Reference (the number carried by the vendor's document) and check the Bill Date as well as the Due Date computed.
- Compare prices and quantities line by line against the attached document.
- Click Confirm.
Note
The quantities carried over are the ones imposed by each product's control policy: ordered or received (see section 10.1.4). On the purchase order, the Received and Billed columns show at any moment where each line stands.
Point d'attention
The gap between the price ordered and the price billed is the main source of margin loss on purchases. Checking line by line at the time of entry is quicker than claiming after payment.
Entering a bill without a digital document
When the bill arrives through another channel, or covers several orders at once:
- Open Accounting › Vendors › Bills and click New.
- Designate the vendor.
- In the Auto-Complete field, choose the purchase order to be taken over. The lines fill in on their own.
- Repeat the operation to attach a second order to the same bill.
Astuce
To handle a batch of orders from the same vendor, select them in the list view and use the Create Bills button in the header. Odoo groups the lines onto a single bill per vendor.
Recording the payment
- Open the vendor bill, in the Posted state.
- Click Pay.
- Fill in the amount, the Payment Date, the bank Journal and the Payment Method.
- Click Create Payment.
The Amount Due shown at the foot of the bill follows the payments recorded: it falls to zero once the bill is settled.
Note
The Pay button only appears once the bill is posted and as long as it is not settled. On a draft, only Confirm is offered.
To settle several bills from the same vendor in a single operation, go through Accounting › Vendors › Payments.
Astuce
A posted bill can still be edited through Reset to Draft as long as no payment is attached to it. Beyond that, correction goes through a Credit Note.
Automating replenishment
The replenishment screen
Inventory › Operations › Procurement › Replenishment brings together everything that is missing: the products whose forecast stock is insufficient, and the quantity that would have to be ordered to put that right.
Each line shows the On Hand stock, the Forecast taking current orders into account, the Min and Max thresholds if any exist, and the To Order quantity computed.
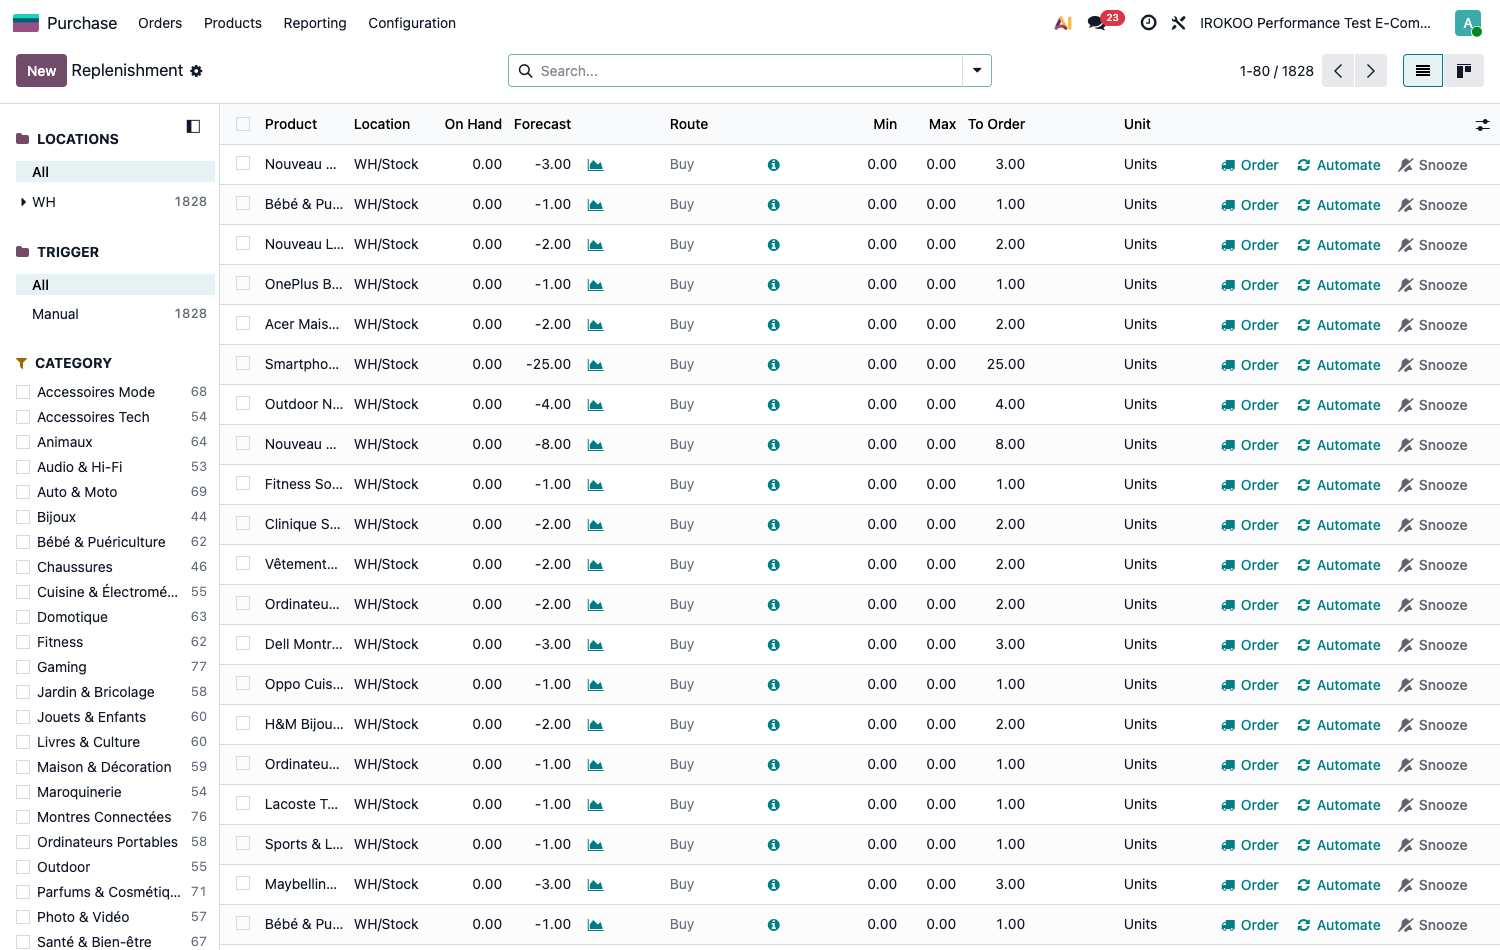
The Horizon field in the side panel sets the depth of the analysis: at three hundred and sixty-five days, the screen takes into account every known need of the year; reduced to thirty days, it shows only the immediate urgency.
Handling a line
Three actions sit at the end of each line, and act on that line only.
| Action | Effect |
|---|---|
| Order | Launches supply for that line only: a request for quotation if the product is bought, a manufacturing order if it is produced. The line disappears from the screen, the need being covered. |
| Automate | Turns this one-off need into a permanent rule, then launches supply. The product will from then on be monitored continuously, without going through this screen again. |
| Snooze | Hides the line until a chosen date. The need is not handled, merely set aside from the list, useful for a product whose replenishment you know is already under way elsewhere. |
Point d'attention
These buttons act line by line. There is no single button that handles the whole screen: to cover several needs at once, tick the lines you want before acting.
Setting a permanent rule
A product with regular consumption is better monitored continuously than examined on each visit to the replenishment screen.
- Open Inventory › Operations › Procurement › Replenishment.
- Click New.
- Fill in: - the product concerned; - the Min threshold, below which replenishment is triggered; - the Max level, to be reached when replenishing.
- Display the Trigger column using the column selector, to the right of the table header: it is hidden by default.
- Switch the trigger from Manual to Auto.
- Save.
Point d'attention
A rule created from the replenishment screen is born Manual, and stays that way until it is changed. It then merely feeds this screen, where the decision has to be taken again on every visit: the thresholds entered trigger nothing by themselves.
Only the Auto trigger hands the rule over to the nightly scheduler, which creates the documents without intervention.
Astuce
The Automate button on a suggestion line does both at once: it switches the trigger and launches supply. It is the quickest way to turn an observed need into a permanent rule.
Note
Odoo does not order as soon as the threshold is crossed: it takes lead times into account so as to launch supply at the latest possible moment, so that the goods arrive for the date they are needed. The detail of that computation and the three levels of lead time that feed it are given in section 15.5.
Astuce
Keep automatic rules for references whose consumption is stable and predictable. On a catalogue with irregular turnover, the replenishment screen consulted periodically gives better control than a fleet of thresholds to maintain.
Analysing purchases
Analysis report
This is the purchase analysis tool, available on any database where the app is installed.
- Open Purchase › Reporting › Purchase.
- Cross the data by vendor, product, category or period, using Group By.
- Switch between graph view, pivot view and list view as needed.
The measures available cover the amount purchased, the quantities ordered and received, the confirmation lead time and the receipt lead time. Crossed with a grouping by vendor, they give the most useful reading: who weighs most in spending, and who keeps to their lead times.
Astuce
An analysis built once can be kept: save the filter and the grouping as a favourite, and it will be offered next time you open the report. The manoeuvre is detailed in chapitre 19 and works in every app.
Indicators to follow
- Average delivery lead time per vendor and adherence to the lead times announced.
- Gap between the negotiated price and the price billed.
- Purchase concentration: share of spending made with the main vendors.
- Delivery conformity rate.
Subcontracting an operation
When all or part of a manufacturing operation is entrusted to a third party, subcontracting combines the Purchase, Inventory and Manufacturing apps: the components are sent to the subcontractor, the transformed product is received like an ordinary purchase. The full implementation is described in chapitre 17.
Good practice
Keeping spending under control
- Consolidation: group needs by vendor to obtain better conditions and reduce shipping costs.
- History: analyse how prices have moved before renegotiating.
- Assessment: track each vendor's service level, not just their price.
- Anticipation: rely on reordering rules rather than on individual vigilance.
- Control: systematically check that deliveries and bills conform.
- Alternatives: keep at least two sources for critical products.